You are here
What is a Lever?
-
A
lever is a rigid bar that can rotate about a fixed point
.
Example: A seesaw — a rigid plank rotating about its central support.
-
GIF Watch: what is a Lever

- In everyday life, levers are often used to lift heavy objects.
- Lets see this in an activity.
- Take a 30 cm long scale, a pencil, 2–3 erasers and a stapler (or a similar object).
-
GIF Watch: activity 7.4 — Let us investigate

- Step 1 — Place the scale over the pencil such that the pencil is closer to one end of the scale.
- Step 2 — On the end of the scale closer to the pencil, place the stapler.
- Step 3 — On the other end of the scale, place one eraser. Does the stapler lift up? If not, add one more eraser.
What do we observe?
- A much heavier object (the stapler) could be lifted by a much lighter object (the eraser)!
-
This was made possible by using the scale as a
lever
—
- Rigid bar = the scale
- Fixed point = the point of contact of the scale with the pencil

What are the 3 main parts of a Lever?
| Part | Meaning | In Activity 7.4 |
|---|---|---|
| Fulcrum | The fixed point about which the lever rotates | The pencil |
| Load | The force to be overcome | The stapler |
| Effort | The force applied | The eraser's weight |
GIF
Watch: what are the 3 main parts of a Lever
-
Two more terms
- Load arm — the distance of the load from the fulcrum.
- Effort arm — the distance of the effort from the fulcrum.
How does a lever apply a large force with a small effort?
GIF
Watch: how does a lever apply a large force with a small effort

- By applying a small force at one end of the lever, a larger force can be applied on the object at the other end. How is this possible?
- The end where the smaller force (F₁) is applied moves a larger distance (d₁).
- The other end which applies a larger force (F₂) to lift the heavier object moves a smaller distance (d₂).
- The work done on one end of the lever is transferred to the other end.
-
Work is the same on both ends
- F₁ × d₁ = F₂ × d₂
- Take a long scale (50 cm or larger), a piece of string, two paper cups (to act as pans), adhesive tape or a piece of thread, and identical coins (to act as weights).
-
GIF Watch: activity 7.5 — Let us experiment (Beam balance)

- Step 1 — Tie the string tightly around the scale at its midpoint. This string will act as the fulcrum. Hang the scale from this string using a stand or hook, so that it can swing freely. This scale will now act as a beam.
- Step 2 — Fix paper cups to both ends of the beam using thread. These cups act as the pans of a balance. Check whether the beam is levelled. If it is tilted, adjust the hanging points of the pans until both sides balance equally.
- Step 3 — Place 1 coin in the left pan (call it effort) and 1 identical coin in the right pan (call it load). Observe that the beam stays horizontal.
- Step 4 — Add one more coin to the right pan, so that it contains 2 coins. The beam tilts. Move the heavier pan closer to the centre of the beam to balance the beam. Measure its distance from the centre.
- Step 5 — Repeat step 4 with 4 coins and then 8 coins in the right pan. Each time, note its distance from the centre that balances the beam.
What do we conclude from Activity 7.5?
-
The beam balances when
- n₁ × L₁ = n₂ × L₂
- (n = number of coins, L = distance from the fulcrum)
-
In other words

- Effort × Effort arm = Load × Load arm
- If the effort arm is increased, the effort required to move the same load is reduced .
What is the Mechanical Advantage of a Lever?
- From Effort × Effort arm = Load × Load arm
-
Rearranging
- Load / Effort = Effort arm / Load arm
- Mechanical advantage = Load / Effort
- Mechanical advantage of a lever = Effort arm / Load arm
-
By increasing the
effort arm
, the lever applies a larger force F₂ to the load than the effort F₁.
Example: Effort arm = 40 cm, Load arm = 10 cm
MA = 40 / 10 = 4
A 10 N effort can lift a 40 N load! -
GIF Watch: what is the Mechanical Advantage of a Lever
Does a lever reduce the total work?
- No. A lever reduces the force required to perform a task, but not the total work done.
- The effort is smaller, but it has to move by a larger distance — so the total work done by the agency applying the effort remains the same.
📘 Example 7.13 (NCERT)
For a seesaw having four seats A, B, D, E and fulcrum at C (Fig. 7.34), AC = EC = 2 m and BC = DC = 1 m. On which seats should children of masses 15 kg and 30 kg sit to make the seesaw balanced?
GIF
Watch: what is the Mechanical Advantage of a Lever

- Suppose the child of mass 15 kg sits on seat A (2 m from fulcrum).
- Let the other child (30 kg) sit at a distance L from the fulcrum.
-
Using Effort × Effort arm = Load × Load arm
- 15 kg × 2 m = 30 kg × L
- L = 30 / 30
- L = 1 m
- The seat at 1 m on the other side is seat D.
- The 15 kg child sits on seat A, and the 30 kg child sits on seat D.
What are the classes of Levers?
GIF
Watch: what are the classes of Levers

Levers can be of three classes depending upon the relative positions of effort, fulcrum and load.
| Class | What is in between | Examples |
|---|---|---|
| Class I | Fulcrum in between (Load — Fulcrum — Effort) | Tongs, scissors, crowbar, pliers, balance scale, seesaw |
| Class II | Load in between (Fulcrum — Load — Effort) | Lemon squeezer, wheel barrow, bottle opener |
| Class III | Effort in between (Fulcrum — Effort — Load) | Tongs, tweezers, broom, hammer, oar |
Are all machines made of simple machines?
- Many machines used in daily life are made up of two or more simple machines .
- The next time you see a machine, try to identify the simple machines within them.
-
In all cases, the conservation of mechanical energy holds.
- The work we put in = the useful work done on the load (ignoring friction).
- Machines do not create energy, they only help us use it more effectively.
-
🤔 Pause and Ponder 11 (from the book)
Why is it easier to open the lid of a can by using a spoon (Fig. 7.35)?GIF Watch: what are the classes of Levers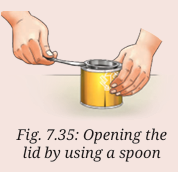
View answer
AnswerGIF Watch: what are the classes of Levers
- The spoon acts as a lever .
- The edge of the can acts as the fulcrum.
- The effort arm (handle of the spoon) is much longer than the load arm (tip under the lid).
- MA = Effort arm / Load arm is large — a small effort applies a large force on the lid.
- So the lid opens easily.
-
🤔 Pause and Ponder 12 (from the book)
Why do you push an object closer to scissors fulcrum when you want to cut an object which is hard?View answer
Answer- Scissors are a lever with the fulcrum at the pivot (screw).
- Moving the object closer to the fulcrum makes the load arm smaller .
- MA = Effort arm / Load arm — smaller load arm means larger mechanical advantage.
- So the same effort by our hand applies a much larger cutting force on the hard object.
-
🤔 Pause and Ponder 13 + What If (from the book)
Throughout history, many designs of perpetual machines (using wheels, weights or magnets) have been proposed but none actually work. Why do all real machines eventually slow down and stop? Explain in terms of work and energy.View answer
Answer- Every real machine has friction (and air resistance) between its moving parts.
- Friction does negative work on the machine — it keeps taking away mechanical energy as heat.
- No machine creates energy — machines only transfer or transform energy.
- So without a continuous supply of energy (fuel, electricity), the mechanical energy keeps decreasing.
- Eventually all the energy is drained — the machine slows down and stops.
- That is why a perpetual motion machine is impossible — it would need to create energy from nothing, which violates the conservation of energy.
-
📋 Revise, Reflect, Refine, Q9 (Page 138)

On a seesaw with sliding seats, a child is sitting on one side and an adult on the other side. The adult weighs twice that of the child. The seesaw however is balanced. Draw a figure which depicts this situation showing the distances from the fulcrum where the child and the adult are seated.View answer
Answer- For balance — Effort × Effort arm = Load × Load arm
- Let the child's weight = W, sitting at distance d from the fulcrum.
-
Adult's weight = 2W, sitting at distance L.
- W × d = 2W × L
- L = d / 2
- The adult must sit at half the distance of the child from the fulcrum.
-
GIF Watch: what are the classes of Levers
-
Figure description (to draw) —
- A seesaw balanced on a fulcrum at the centre.
- Child on the left at distance d (e.g. 2 m) from the fulcrum.
- Adult on the right at distance d/2 (e.g. 1 m) from the fulcrum.
- Label — child weight W at 2 m, adult weight 2W at 1 m. W × 2 = 2W × 1 ✓ balanced.
📝 Important points — 7.6.3 Lever
| Point | Detail |
|---|---|
| Lever | Rigid bar rotating about a fixed point |
| 3 parts | Fulcrum, Load, Effort |
| Arms | Load arm and Effort arm — distances from the fulcrum |
| Balance rule | Effort × Effort arm = Load × Load arm (F₁d₁ = F₂d₂) |
| Mechanical advantage | Effort arm / Load arm |
| Longer effort arm | Less effort needed |
| Work | Not reduced — smaller force moves a larger distance |
| 3 classes | I — fulcrum between, II — load between, III — effort between |
💡 Worth remembering
- Lever rule in one line — Effort × Effort arm = Load × Load arm. Every lever question is this one equation.
- Want more force? Increase the effort arm, or decrease the load arm.
- Machines never create energy — they only trade force for distance.
✅ Quick self-check
-
A lever has an effort arm of 60 cm and a load arm of 20 cm. Find its mechanical advantage.
View Answer
- MA = Effort arm / Load arm
- MA = 60 / 20
- MA = 3
-
Using the lever of Question 1, how much effort is needed to lift a 90 N load?
View Answer
- MA = Load / Effort
- 3 = 90 / Effort
- Effort = 90 / 3
- Effort = 30 N
-
In a wheel barrow, the load is between the fulcrum (wheel) and the effort (handles). Which class of lever is it?
View Answer
- Load in between = Class II lever .
Key terms and units
| Term | Meaning |
|---|---|
| Lever | Rigid bar that rotates about a fixed point |
| Fulcrum | Fixed point of rotation |
| Load arm | Distance of load from fulcrum |
| Effort arm | Distance of effort from fulcrum |
| MA of lever | Effort arm / Load arm |
Bridging Science and Society — The Watermill (Gharat/Panchakki)
GIF
Watch: the watermill — potential energy to kinetic energy to grinding

- In the Himalayan region, water flowing downhill converts its potential energy into kinetic energy.
- Traditionally, this energy was used in devices such as the gharat or panchakki — a water mill used to grind grain. These can still be found in hilly regions.
-
How it works
- The water starts from the top with potential energy .
- This potential energy gets converted to kinetic energy as it comes down the pipe.
- The kinetic energy of the water drives the wheel and sets it into rotational motion.
- The wheel is connected to the grinding stone at the top.
- In modern times, the potential energy of the water stored in dams is similarly converted into kinetic energy to generate electricity .
-
📋 Revise, Reflect, Refine, Q1 (Page 136)
State whether True or False.View answer
AnswerStatement True/False Reason (i) Work is said to be done when a force is applied, even if the object does not move. False Work needs BOTH force and displacement. No displacement, no work. (ii) Lifting a bucket vertically upward results in positive work done on the bucket. True Our force (up) and displacement (up) are in the same direction. (iii) The SI unit for both work and energy is joule (J). True Energy is measured by capacity to do work — same unit. (iv) A motionless stretched rubber band has kinetic energy. False It is motionless — no kinetic energy. It has POTENTIAL energy (due to deformation). (v) Energy can change from one form to another. True Example — electrical to light in a bulb.
-
📋 Revise, Reflect, Refine, Q2 (Page 137)
Fill in the blanks.View answer
AnswerStatement Answer (i) Work done = _____ × _____ (in the direction of force). Force × Displacement (ii) 1 joule of work is done when a force of _____ newton displaces an object by 1 metre in the direction of the force. 1 (one) (iii) The expression for kinetic energy of a body of mass m and velocity v is _____. ½mv² (iv) The potential energy of an object of mass m at a small height h from the Earth's surface is _____. mgh (v) Power is defined as the _____ at which work is done. rate